Unleashing the Colors: A Comprehensive Guide to Creating a Stunning Rainbow Row Painting
Table of Content
Introduction:
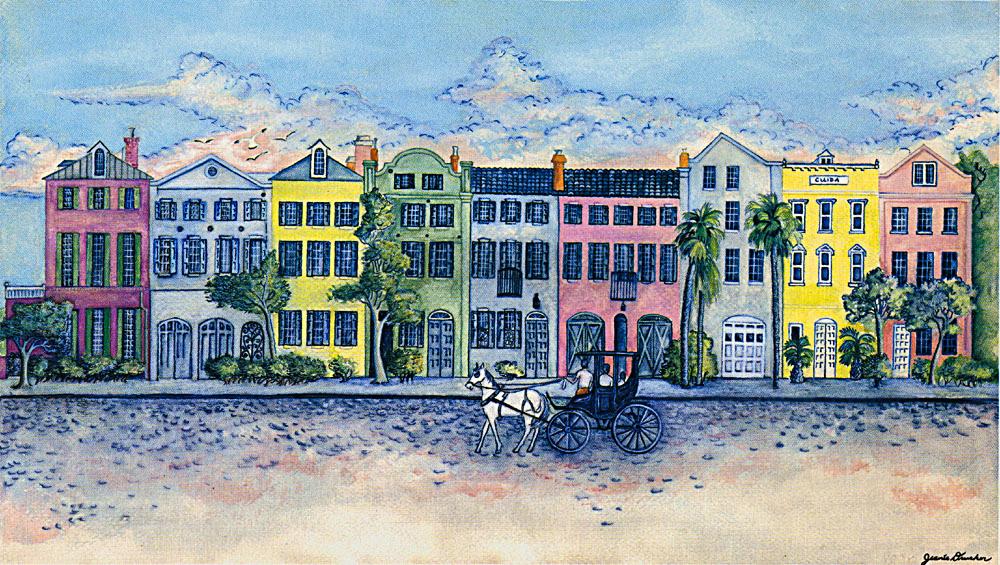
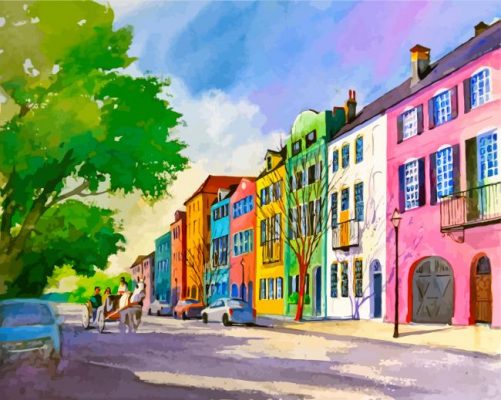
The vibrant and captivating allure of a Rainbow Row painting lies in its ability to capture the essence of joy, energy, and harmony. This iconic style, often associated with the charming historic streets of Charleston, South Carolina, is a testament to the power of color and its ability to transform a simple scene into a mesmerizing work of art. Whether you’re an experienced artist or a curious beginner, this step-by-step guide will equip you with the knowledge and techniques to create your own breathtaking Rainbow Row masterpiece.
1. Gather Your Materials:
Before embarking on this artistic journey, ensure you have the right tools at your disposal.
Essential Materials:
- Canvas: Choose a canvas size that suits your vision and the scale of your Rainbow Row. A rectangular canvas is ideal for capturing the linear perspective of the houses.
- Acrylic Paints: Opt for high-quality acrylic paints in a range of vibrant colors, including:
- Red: Cadmium red, crimson red, or scarlet red
- Orange: Cadmium orange, burnt sienna, or orange ochre
- Yellow: Cadmium yellow, lemon yellow, or yellow ochre
- Green: Phthalo green, emerald green, or sap green
- Blue: Ultramarine blue, cobalt blue, or cerulean blue
- Indigo: Indigo, Prussian blue, or ultramarine blue mixed with black
- Violet: Violet, magenta, or purple

- Brushes: A variety of brushes is essential for achieving different effects. Include:
- Flat brushes: For large areas and filling in blocks of color.
- Round brushes: For details, lines, and creating texture.
- Fan brushes: For blending and creating soft transitions.

- Palette Knife: Use a palette knife for mixing paints, creating textures, and applying thick layers.
- Masking Tape: To create clean lines and sharp edges, especially for window frames and door details.
- Pencil: For sketching the outline of the houses and other architectural features.
- Eraser: To erase pencil lines when necessary.
- Water Container: For cleaning brushes and diluting paints.
- Paper Towels: To wipe excess paint and clean up spills.
Optional Materials:
- White Acrylic Paint: For highlights and creating a sense of depth.
- Black Acrylic Paint: For shadows and adding contrast.
- Golden Acrylic Paint: For accents and creating a warm glow.
- Fine-Point Markers: For adding details like window panes and door handles.
- Spray Varnish: To protect your finished painting and enhance its vibrancy.
2. Planning Your Composition:
A well-planned composition is crucial for a successful Rainbow Row painting. Take inspiration from real-life photographs or images of Charleston’s iconic streets.
Key Considerations:
- Perspective: Capture the linear perspective of the houses, with each house appearing smaller as it recedes into the distance.
- Color Harmony: Choose a color scheme that complements the vibrant hues of the Rainbow Row. Consider using warm colors for the foreground and cooler colors for the background.
- Balance: Ensure a balanced composition by distributing the houses evenly across the canvas. Avoid overcrowding the scene.
- Focal Point: Create a focal point by emphasizing a particular house or element within the composition.
3. Sketching the Outline:
Using a pencil, lightly sketch the outline of the houses and other architectural features on your canvas.
Tips:
- Use light, confident strokes to avoid leaving deep indentations in the canvas.
- Pay attention to the proportions and angles of the houses.
- Consider adding details like windows, doors, balconies, and rooflines.
4. Laying Down the Base Colors:
Start by blocking in the base colors of the houses, working from left to right.
Tips:
- Use a flat brush to apply smooth, even layers of paint.
- Allow each layer to dry completely before applying the next.
- Use masking tape to create clean lines between the houses and for window frames.
5. Adding Depth and Detail:
Once the base colors are dry, start adding depth and detail to the painting.
Techniques:
- Shading: Use darker shades of the base colors to create shadows and depth.
- Highlights: Use white acrylic paint or lighter shades of the base colors to create highlights.
- Texture: Use a palette knife or a textured brush to create texture on the walls and roofs.
- Details: Add details like window panes, door handles, balconies, and flowers using fine-point markers or smaller brushes.
6. Creating the Street and Surroundings:
Focus on the street and surrounding elements to complete the scene.
Tips:
- Use a dark gray or black paint for the street.
- Add details like sidewalks, trees, and streetlights.
- Use a lighter shade of gray for the sky.
7. Final Touches and Finishing:
Once the painting is complete, add final touches and finish with a protective layer.
Tips:
- Varnish: Apply a spray varnish to protect the painting and enhance its vibrancy.
- Signature: Sign your painting on the back or in a discreet corner of the canvas.
8. Framing Your Masterpiece:
Frame your Rainbow Row painting to enhance its visual appeal and protect it from damage.
Tips:
- Choose a frame that complements the colors and style of the painting.
- Use a mat to create a border around the painting and enhance its presentation.
9. Exploring Variations and Experimentation:
The beauty of art lies in its ability to inspire creativity and experimentation.
Variations:
- Different Color Schemes: Explore different color combinations and palettes to create unique variations of the Rainbow Row.
- Architectural Styles: Experiment with different architectural styles, incorporating elements like porches, gables, and chimneys.
- Landscapes: Expand the scene by adding a surrounding landscape, including trees, flowers, and water features.
10. Finding Inspiration and Resources:
The world of art is brimming with inspiration and resources to fuel your creative journey.
Inspiration Sources:
- Charleston, South Carolina: Visit Charleston to witness the real Rainbow Row and draw inspiration from its vibrant colors and architecture.
- Art Galleries and Museums: Explore art galleries and museums to discover the works of renowned artists and learn from their techniques.
- Online Resources: Utilize online resources like Pinterest, Instagram, and YouTube for visual inspiration and tutorials.
Resources:
- Art Supply Stores: Find all the necessary materials and supplies at local art supply stores or online retailers.
- Art Books and Magazines: Explore art books and magazines for techniques, tips, and inspiration.
- Online Art Communities: Connect with other artists and share your work in online art communities.
Conclusion:
Creating a Rainbow Row painting is a rewarding and fulfilling experience that allows you to express your creativity and capture the vibrant spirit of this iconic style. By following this comprehensive guide, you’ll be well-equipped to embark on your artistic journey and create a stunning masterpiece that will bring joy and color to your life. Remember, art is a journey of exploration and discovery, so embrace your creativity and let your imagination soar as you unleash the colors of your own Rainbow Row.
Unleashing the Colors: A Comprehensive Guide to Creating a Stunning Rainbow Row Painting
Post a Comment for "Creating A Rainbow Row Painting: A Step-by-Step Guide"