Crafting a Rose Diamond Painting: A Step-by-Step Guide to Stunning Floral Art

Table of Content
- 1 Crafting a Rose Diamond Painting: A Step-by-Step Guide to Stunning Floral Art
- 1.1 Choosing the Perfect Rose Diamond Painting Kit
- 1.2 Preparing Your Workspace and Materials
- 1.3 Understanding the Diamond Painting Process
- 1.4 Mastering the Art of Diamond Placement
- 1.5 Finishing Touches and Preserving Your Masterpiece
- 1.6 Incorporating Personal Touches and Creativity
- 1.7 Conclusion: A Journey of Beauty and Self-Expression
Diamond painting, also known as diamond embroidery, has become a popular hobby for its meditative nature and the ability to create stunningly detailed artworks. Among the most beloved subjects in diamond painting are roses, with their captivating beauty and symbolic meaning. This comprehensive guide will walk you through the process of crafting a rose diamond painting, from choosing the right kit to completing your masterpiece.
Choosing the Perfect Rose Diamond Painting Kit
The first step in embarking on your rose diamond painting journey is selecting the perfect kit. Consider these key factors when making your choice:
- Size: Kits come in various sizes, from small, intimate designs to large, intricate pieces. Choose a size that suits your skill level and available space.
- Design: Explore a wide range of rose diamond painting designs, from simple line drawings to highly detailed, photorealistic images. Consider the level of complexity you’re comfortable with and the specific aesthetic you desire.
- Diamond Shape: Diamond painting kits typically utilize square or round diamonds. Square diamonds offer a more intricate finish, while round diamonds create a smoother, more traditional look.
- Diamond Quality: Higher quality diamonds are more vibrant, have a better shine, and are less likely to fall out during the painting process. Look for kits that use high-quality, full-drill diamonds.
- Canvas Type: Canvas can be made from either oil paint or canvas paper. Oil paint canvas is more durable and resistant to wrinkles, while canvas paper is more budget-friendly.
- Brand Reputation: Choose kits from reputable brands known for their quality materials and customer service.

Here are some popular brands offering beautiful rose diamond painting kits:
- Diamond Art Club: Offers a wide selection of rose designs, from classic red roses to vibrant pink and white blooms.
- Diamond Painting Kit: Known for its high-quality materials and affordable prices.
- Diamond Dotz: Offers unique and creative rose designs, including those incorporating intricate patterns and textures.
Preparing Your Workspace and Materials
Once you have your kit, gather the necessary tools and prepare your workspace for a smooth and enjoyable diamond painting experience.
Here’s what you’ll need:

- Diamond Painting Kit: This includes the canvas, diamonds, adhesive pen, tray, wax, tweezers, and instructions.
- Comfortable Workspace: Choose a well-lit, spacious area with a flat surface.
- Good Lighting: Ensure adequate lighting to easily distinguish the symbols on the canvas and the diamonds.
- Scissors: For opening the diamond bags and trimming the canvas if necessary.
- Tweezers: For picking up and placing individual diamonds, especially for smaller designs.
- Gloves (optional): Protect your hands from the adhesive on the canvas and prevent fingerprints.
Preparing your workspace:
- Clean the workspace: Remove any clutter and ensure the surface is clean and free of dust.
- Set up your supplies: Arrange your diamond bags, tray, tweezers, adhesive pen, and wax within easy reach.
- Prepare the canvas: Remove the protective film from the canvas, revealing the adhesive surface.
Understanding the Diamond Painting Process
Diamond painting involves placing tiny, faceted diamonds onto a sticky canvas to create a detailed mosaic image. Each diamond is marked with a corresponding symbol that matches a symbol on the canvas, ensuring you place the correct diamond in the right spot.
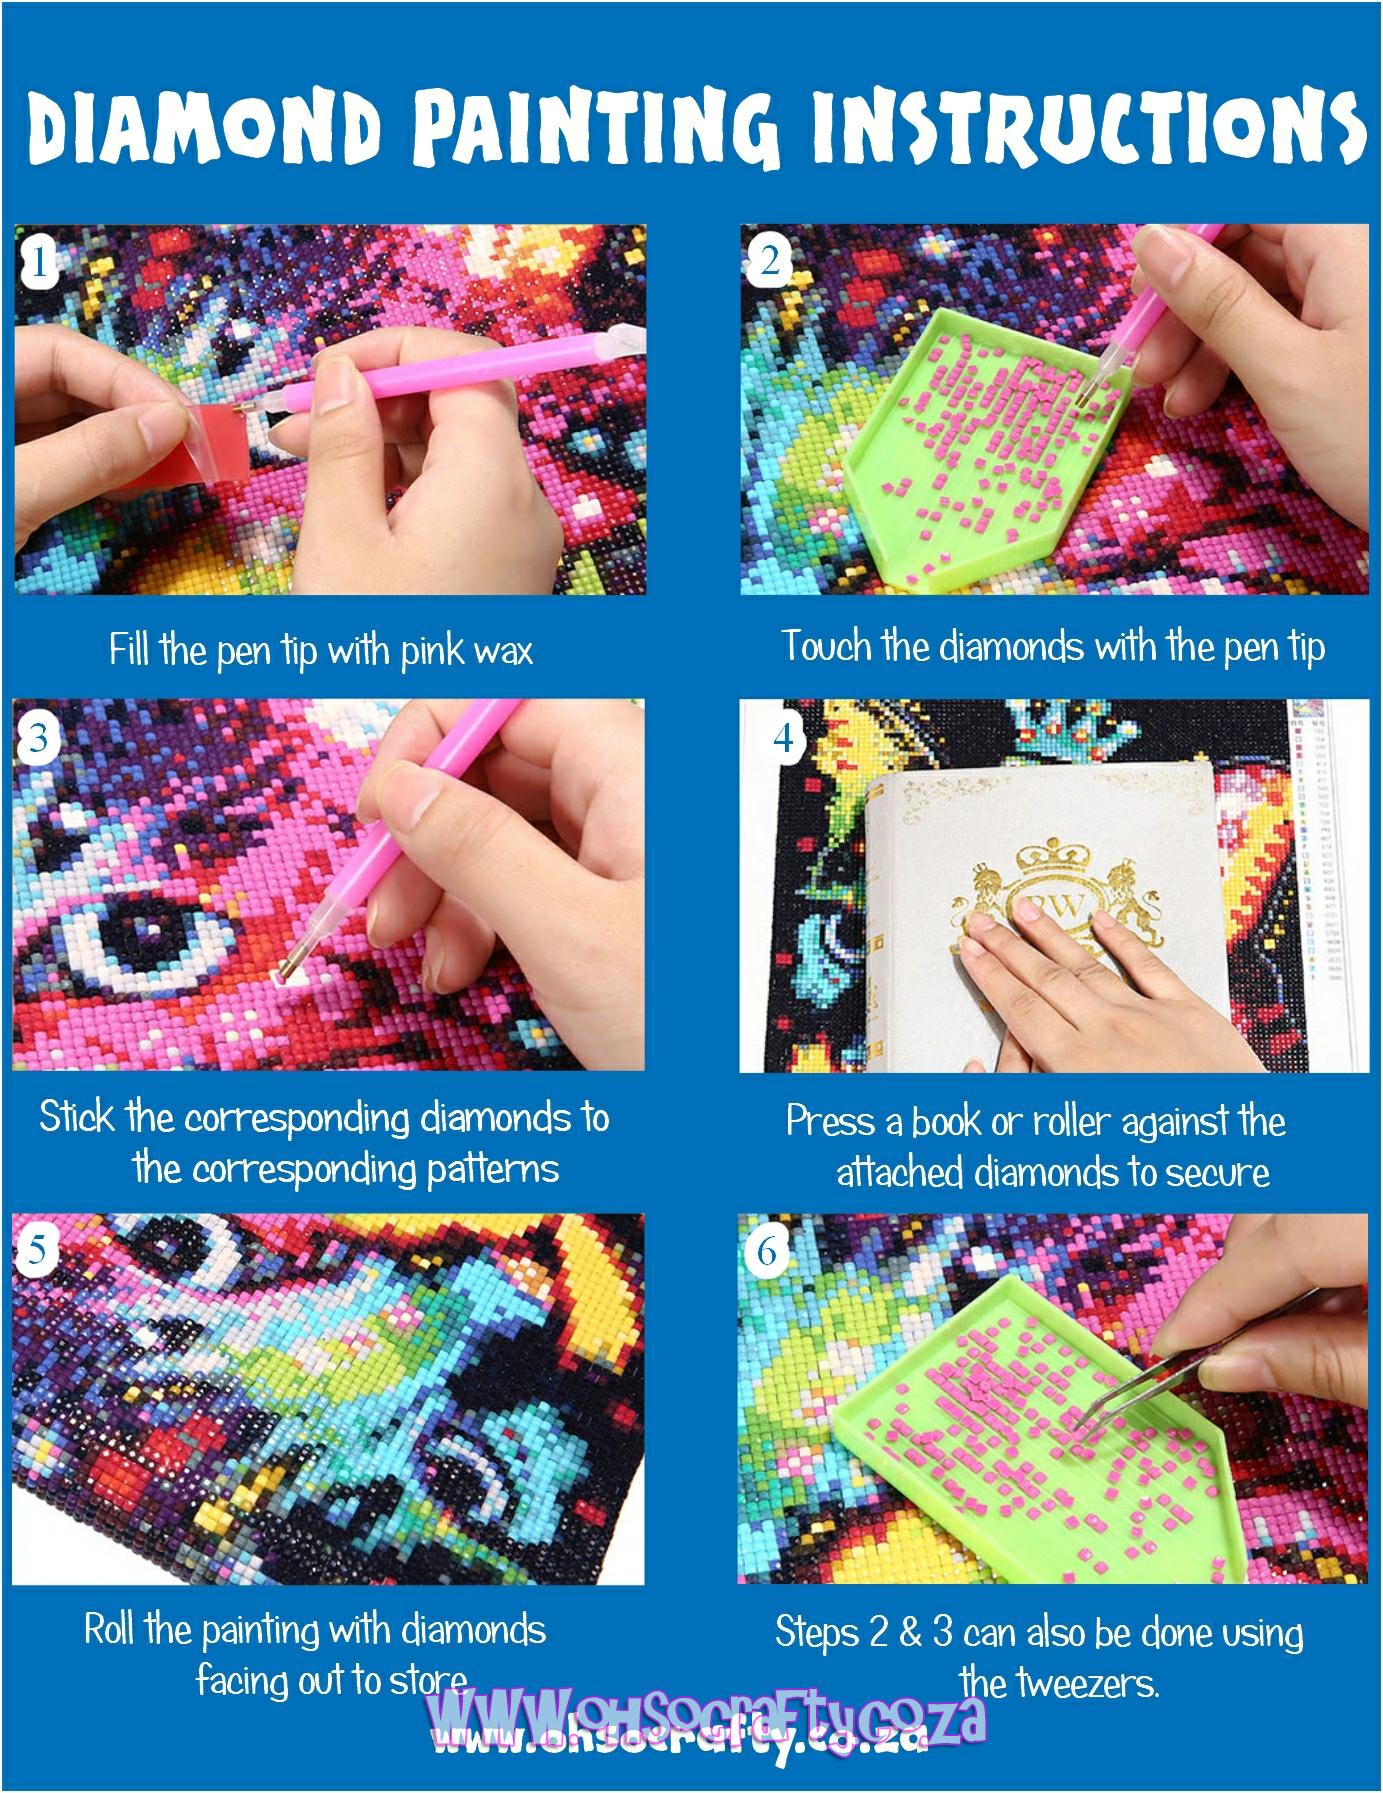
Here’s a step-by-step guide to diamond painting:
- Identify the symbol: Locate the symbol on the canvas that corresponds to the diamond bag you’re working with.
- Pour diamonds: Pour a small amount of diamonds from the bag into the tray.
- Apply wax: Using the adhesive pen, gently rub the tip on the wax to pick up some adhesive.
- Pick up a diamond: Use the adhesive pen to pick up a diamond by gently pressing the tip onto the flat side of the diamond.
- Place the diamond: Carefully align the diamond with the corresponding symbol on the canvas and press it down firmly.
- Repeat the process: Continue picking up diamonds and placing them on the canvas until the entire section is filled.
Tips for a smooth diamond painting experience:
- Start with a small area: Begin with a small section of the canvas to get a feel for the process before moving on to larger areas.
- Work in rows: Work your way across the canvas in rows, ensuring each diamond is securely placed.
- Use tweezers for smaller diamonds: Tweezers provide greater control and precision when placing smaller diamonds.
- Press firmly: Make sure each diamond is firmly pressed onto the canvas to ensure it stays in place.
- Don’t worry about mistakes: If you accidentally place a diamond in the wrong spot, you can use the adhesive pen to remove it and reposition it correctly.
Mastering the Art of Diamond Placement
Placing diamonds accurately and securely is crucial for a beautiful and durable diamond painting. Here are some advanced techniques to enhance your diamond painting skills:
Diamond Placement Techniques:
- Direct placement: This involves using the adhesive pen to pick up a diamond and directly placing it on the canvas. This is a quick and efficient technique, but it may require more precision.
- Tweezers placement: Tweezers provide greater control and allow for more precise placement, especially for smaller diamonds.
- Pick-and-place: This technique involves using a small tool to pick up multiple diamonds at once and place them on the canvas. This is a faster technique but requires practice to ensure accurate placement.
Diamond Alignment:
- Horizontal and vertical alignment: Ensure that diamonds are placed in straight rows, both horizontally and vertically.
- Diagonal alignment: For designs with diagonal lines, carefully align diamonds along the diagonal lines.
- Curved alignment: For curved lines and shapes, use tweezers to carefully place diamonds along the curve, ensuring a smooth transition.
Diamond Coverage:
- Full coverage: For a fully finished look, ensure that all the symbols on the canvas are covered with diamonds.
- Partial coverage: Some designs may feature partial coverage, leaving certain areas blank. Follow the instructions and design template for the specific kit.
Finishing Touches and Preserving Your Masterpiece
Once you’ve completed your rose diamond painting, add the finishing touches and preserve your masterpiece for years to come.
- Pressing the canvas: After completing the painting, gently press the canvas with a flat object, such as a book or a ruler, to ensure that all diamonds are securely attached.
- Framing your masterpiece: Consider framing your diamond painting to protect it from dust and damage. Choose a frame that complements the design and enhances its visual appeal.
- Displaying your artwork: Find a prominent place to display your completed rose diamond painting, where it can be admired and enjoyed.
Incorporating Personal Touches and Creativity
Diamond painting is a highly customizable art form. Don’t be afraid to experiment and add your personal touch to create a truly unique masterpiece.
- Adding embellishments: Consider adding embellishments like glitter, sequins, or beads to enhance the visual interest of your rose diamond painting.
- Creating custom designs: If you’re feeling adventurous, try designing your own rose diamond painting using a digital image editing software.
- Sharing your artwork: Share your completed rose diamond painting with friends and family, or even display it in online galleries and social media platforms.
Conclusion: A Journey of Beauty and Self-Expression
Crafting a rose diamond painting is a rewarding journey that combines patience, precision, and creativity. From selecting the perfect kit to adding your own personal touches, each step of the process offers an opportunity for self-expression and the creation of a beautiful and meaningful artwork. Whether you’re a seasoned diamond painting enthusiast or a curious beginner, embrace the challenge and embark on your own rose diamond painting adventure. The result will be a stunning floral masterpiece that brings joy and beauty to your life.
Crafting a Rose Diamond Painting: A Step-by-Step Guide to Stunning Floral Art
Post a Comment for "Crafting A Rose Diamond Painting: A Step-by-Step Guide"