Boat Touch Up Paint: Matching & Application for a Flawless Finish

Table of Content
- 1 Boat Touch Up Paint: Matching & Application for a Flawless Finish
- 2 Boat Touch-Up Paint: A Comprehensive Guide to Matching and Application
- 2.1 Introduction
- 2.2 Understanding Boat Paint Types
- 2.2.1 1. Gelcoat:
- 2.2.2 2. Two-Part Polyurethane:
- 2.2.3 3. Single-Part Acrylic:
- 2.2.4 4. Epoxy Primer:
- 2.3 Color Matching: Achieving a Perfect Match
- 2.3.5 1. Using a Color Chart:
- 2.3.6 2. Color Matching Software:
- 2.3.7 3. Professional Color Matching:
- 2.4 Tips for Choosing the Right Touch-Up Paint
- 2.5 Preparing the Surface for Application
- 2.5.8 1. Clean the Area:
- 2.5.9 2. Sand the Surface:
- 2.5.10 3. Apply a Primer (if necessary):
- 2.6 Applying Touch-Up Paint: A Step-by-Step Guide
- 2.6.11 1. Mix the Paint:
- 2.6.12 2. Apply Thin Coats:
- 2.6.13 3. Feather the Edges:
- 2.6.14 4. Apply a Topcoat (if necessary):
- 2.7 Tips for a Professional Finish
- 2.8 Maintaining Your Boat’s Finish
- 2.8.15 1. Regular Cleaning:
- 2.8.16 2. Waxing:
- 2.8.17 3. Inspect for Damage:
- 2.9 Conclusion
- 2.10 Diagram:
Maintaining your boat’s pristine appearance is essential, and touch-up paint plays a crucial role in preserving its value and aesthetics. Whether it’s a minor scratch, a chipped hull, or fading gelcoat, the right touch-up paint can seamlessly blend with the existing finish, restoring your boat to its former glory.
This comprehensive guide will delve into the intricacies of boat touch-up paint, covering everything from selecting the perfect match to applying it flawlessly. We’ll explore the different types of boat paint, provide expert tips for color matching, and guide you through the application process, ensuring a professional-looking finish every time.
Understanding Boat Paint Types
The first step in selecting the right touch-up paint is understanding the different types available:
- Gelcoat: This is a thick, durable resin applied to the fiberglass hull of most boats, providing a smooth, glossy finish. Gelcoat touch-up paint is specifically formulated to match the original gelcoat color and texture.
- Two-Part Polyurethane: This type of paint is known for its exceptional durability and UV resistance, making it ideal for above-water applications like decks, cabins, and superstructures.
- Single-Part Acrylic: This paint offers a good balance of durability and affordability, making it a popular choice for touch-ups on smaller boats or areas less exposed to harsh conditions.
- Epoxy Primer: This primer is typically used as a base coat before applying topcoats like polyurethane or acrylic. It provides excellent adhesion and corrosion resistance, ensuring a long-lasting finish.
Color Matching: The Key to a Seamless Finish
Achieving a perfect color match is crucial for a professional-looking touch-up. Here’s a breakdown of the most effective methods:
- Using a Color Chart: Most paint manufacturers offer comprehensive color charts that display a wide range of shades. While this method can be helpful, it’s not always accurate, especially for older boats where the original color may have faded.
- Color Matching Software: Many paint retailers offer color matching software that analyzes a sample of your boat’s existing paint and generates a custom color formula. This method is generally more accurate than using a color chart.
- Professional Color Matching: For the most precise match, consider consulting a professional paint shop that specializes in marine paint. They will use specialized equipment to analyze your boat’s paint and create a custom formula.
Tips for Choosing the Right Touch-Up Paint
- Consider the Paint’s Durability: For areas exposed to harsh conditions, choose a durable paint like two-part polyurethane. For less demanding areas, a single-part acrylic paint might suffice.
- Match the Finish: Ensure the touch-up paint has the same finish as the original paint, whether it’s gloss, semi-gloss, or matte.
- Check the Compatibility: If you’re unsure about the compatibility of the touch-up paint with your existing paint, consult the manufacturer’s instructions or a paint specialist.

Preparing the Surface for Application
Proper surface preparation is essential for a smooth and long-lasting finish:
- Clean the Area: Thoroughly clean the area to be painted with soap and water, removing any dirt, grease, or wax.
- Sand the Surface: Lightly sand the surrounding area to ensure a smooth transition between the old and new paint.
- Apply a Primer (if necessary): For areas with bare fiberglass or significant damage, apply a primer to promote adhesion and prevent rust.
Applying Touch-Up Paint: A Step-by-Step Guide
- Mix the Paint: Follow the manufacturer’s instructions for mixing the paint, ensuring it’s the correct consistency for application.
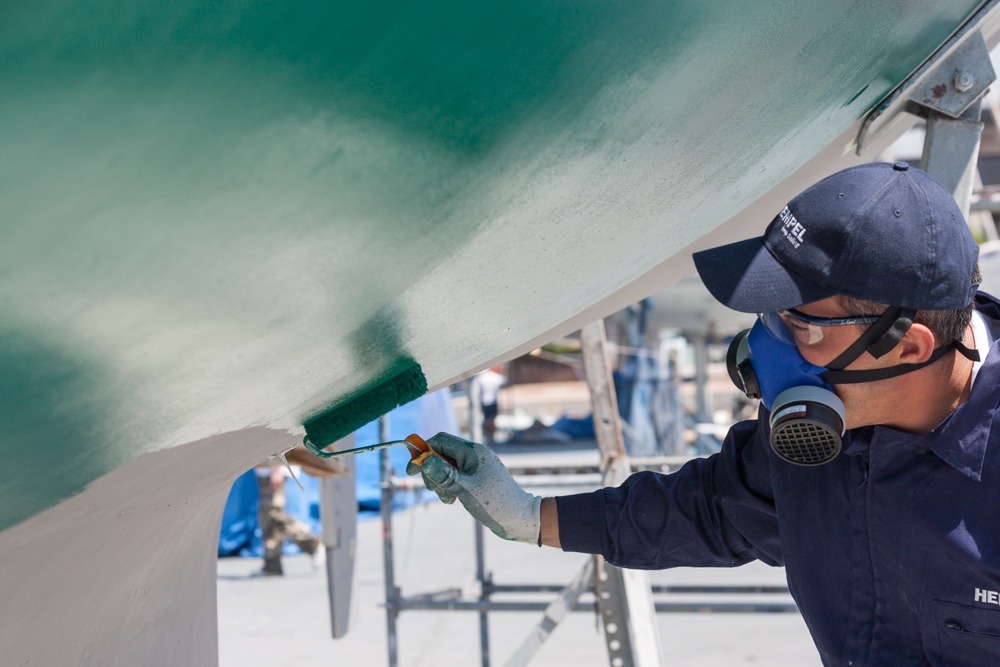
- Apply Thin Coats: Apply thin, even coats of paint, allowing each coat to dry completely before applying the next. This will prevent runs and drips.
- Feather the Edges: Gently blend the edges of the touch-up paint with the surrounding area using a fine-grit sandpaper.
- Apply a Topcoat (if necessary): If using a primer or a single-part acrylic paint, apply a topcoat for added protection and durability.
Tips for a Professional Finish
- Use the Right Tools: Invest in quality brushes, rollers, or spray guns, depending on the size of the area you’re painting.
- Work in a Well-Ventilated Area: Ensure proper ventilation when working with paint, as fumes can be harmful.
- Practice on a Scrap Piece: Before applying paint to your boat, practice on a scrap piece of fiberglass to get a feel for the paint and the application process.
Maintaining Your Boat’s Finish
Once you’ve applied touch-up paint, it’s important to maintain the finish:
- Regular Cleaning: Regularly clean your boat with a mild soap and water solution to remove dirt and grime.
- Waxing: Apply a marine-grade wax to protect the paint from UV damage and weathering.
- Inspect for Damage: Regularly inspect your boat for any new scratches or chips and address them promptly to prevent further damage.
Conclusion
Boat touch-up paint is an essential tool for maintaining your boat’s pristine appearance. By understanding the different types of paint, choosing the right match, and following proper application techniques, you can achieve a professional-looking finish that will enhance your boat’s value and aesthetics. Remember, proper surface preparation, thin coats, and careful blending are key to a successful touch-up job. With a little time and effort, you can easily restore your boat to its former glory and enjoy many years of boating pleasure.
Our Form
Boat Touch-Up Paint: A Comprehensive Guide to Matching and Application
Introduction
Maintaining a boat’s pristine appearance is a crucial aspect of responsible boat ownership. Touch-up paint plays a vital role in preserving the boat’s aesthetics and value, addressing minor scratches, chipped hulls, or fading gelcoat. This comprehensive guide delves into the intricate world of boat touch-up paint, providing a step-by-step approach to selecting the perfect match and achieving a flawless finish.
Understanding Boat Paint Types
1. Gelcoat:
- A thick, durable resin applied to fiberglass hulls, offering a smooth, glossy finish.
- Gelcoat touch-up paint is specifically formulated to match the original gelcoat color and texture.
- Ideal for repairing minor scratches, chips, and imperfections in the gelcoat layer.
2. Two-Part Polyurethane:
- Renowned for its exceptional durability and UV resistance.
- Suitable for above-water applications such as decks, cabins, and superstructures.
- Offers superior protection against weathering, fading, and abrasion.
3. Single-Part Acrylic:
- Provides a good balance of durability and affordability.
- Popular choice for touch-ups on smaller boats or areas less exposed to harsh conditions.
- Offers decent protection against weathering and fading.
4. Epoxy Primer:
- Typically used as a base coat before applying topcoats like polyurethane or acrylic.
- Provides excellent adhesion and corrosion resistance, ensuring a long-lasting finish.
- Ideal for areas with bare fiberglass or significant damage.
Color Matching: Achieving a Perfect Match
1. Using a Color Chart:
- Most paint manufacturers offer comprehensive color charts displaying a wide range of shades.
- While helpful, this method may not always be accurate, especially for older boats with faded paint.
2. Color Matching Software:
- Many paint retailers offer color matching software that analyzes a paint sample and generates a custom formula.
- Generally more accurate than using a color chart, but may not always be completely precise.
3. Professional Color Matching:
- For the most precise match, consult a professional paint shop specializing in marine paint.
- They utilize specialized equipment to analyze the boat’s paint and create a custom formula.
- Offers the highest level of accuracy, ensuring a seamless blend.
Tips for Choosing the Right Touch-Up Paint
- Consider the Paint’s Durability: For areas exposed to harsh conditions, choose durable paints like two-part polyurethane. For less demanding areas, single-part acrylic might suffice.
- Match the Finish: Ensure the touch-up paint has the same finish as the original paint (gloss, semi-gloss, or matte).
- Check Compatibility: If unsure about compatibility, consult the manufacturer’s instructions or a paint specialist.
Preparing the Surface for Application
1. Clean the Area:
- Thoroughly clean the area to be painted with soap and water, removing dirt, grease, or wax.
- Use a mild detergent specifically designed for marine surfaces.
2. Sand the Surface:
- Lightly sand the surrounding area to ensure a smooth transition between the old and new paint.
- Use fine-grit sandpaper (400-600 grit) for a smooth, even finish.
3. Apply a Primer (if necessary):
- For areas with bare fiberglass or significant damage, apply a primer to promote adhesion and prevent rust.
- Choose a marine-grade primer compatible with the topcoat.
Applying Touch-Up Paint: A Step-by-Step Guide
1. Mix the Paint:
- Follow the manufacturer’s instructions for mixing the paint, ensuring the correct consistency.
- Use a clean mixing container and stir thoroughly to ensure uniform color and viscosity.
2. Apply Thin Coats:
- Apply thin, even coats of paint, allowing each coat to dry completely before applying the next.
- This prevents runs and drips, resulting in a smooth, even finish.
3. Feather the Edges:
- Gently blend the edges of the touch-up paint with the surrounding area using fine-grit sandpaper.
- This creates a seamless transition, making the repair less noticeable.
4. Apply a Topcoat (if necessary):
- If using a primer or single-part acrylic paint, apply a topcoat for added protection and durability.
- Choose a topcoat compatible with the primer or base coat.
Tips for a Professional Finish
- Use the Right Tools: Invest in quality brushes, rollers, or spray guns, depending on the size of the area being painted.
- Work in a Well-Ventilated Area: Ensure proper ventilation when working with paint, as fumes can be harmful.
- Practice on a Scrap Piece: Before applying paint to the boat, practice on a scrap piece of fiberglass to get a feel for the paint and application process.
Maintaining Your Boat’s Finish
1. Regular Cleaning:
- Regularly clean the boat with a mild soap and water solution to remove dirt and grime.
- Use a marine-grade soap designed for boat surfaces.
2. Waxing:
- Apply a marine-grade wax to protect the paint from UV damage and weathering.
- Waxing creates a protective barrier, enhancing gloss and longevity.
3. Inspect for Damage:
- Regularly inspect the boat for any new scratches or chips and address them promptly to prevent further damage.
- Promptly addressing minor damage prevents it from becoming more significant.
Conclusion
Boat touch-up paint is a vital tool for maintaining a boat’s pristine appearance. By understanding the different paint types, selecting the perfect match, and following proper application techniques, you can achieve a professional-looking finish that enhances the boat’s value and aesthetics. Remember, proper surface preparation, thin coats, and careful blending are key to a successful touch-up job. With a little time and effort, you can easily restore your boat to its former glory and enjoy many years of boating pleasure.
Diagram:
graph LR A[Boat Paint Types] --> BGelcoat A --> CTwo-Part Polyurethane A --> DSingle-Part Acrylic A --> EEpoxy Primer B --> F[Minor Scratch Repair] C --> G[Above-Water Applications] D --> H[Smaller Boats/Less Demanding Areas] E --> I[Bare Fiberglass/Significant Damage]This diagram illustrates the different types of boat paint and their respective applications.
Boat Touch Up Paint: Matching & Application for a Flawless Finish
Post a Comment for "Boat Touch Up Paint: How To Match And Apply"