Buzzing with Creativity: A Beginner’s Guide to Painting Rock Bees

Table of Content
- 1 Buzzing with Creativity: A Beginner’s Guide to Painting Rock Bees
- 1.1 Gather Your Supplies: A Bee-utiful Toolkit
- 1.2 The Art of Rock Preparation: A Smooth Canvas for Your Bees
- 1.3 Painting Your Bee: From Humble Rock to Buzzing Beauty
- 1.4 Beyond the Basics: Elevate Your Bee Rock Art
- 1.5 Displaying Your Bee Rock Art: Spreading the Buzz
- 1.6 The Power of Rock Painting Bees: More Than Just Art
- 1.7 Conclusion: Let Your Creativity Take Flight
- 2 Our Form: The Ultimate Guide to Rock Painting Bees: A Comprehensive Guide for Beginners and Enthusiasts
Welcome to the enchanting world of rock painting! This guide will equip you with the knowledge and techniques to create adorable bee-themed rock art, transforming ordinary stones into delightful little pollinators. Whether you’re a seasoned artist or a curious beginner, this comprehensive resource will guide you through every step, ensuring your rock bees are buzzing with charm and personality.
Gather Your Supplies: A Bee-utiful Toolkit
Before embarking on your rock painting journey, ensure you have the necessary supplies. Here’s a checklist to get you started:
- Rocks: Seek out smooth, flat rocks in various sizes, preferably with a light-colored surface for optimal paint adherence.
- Acrylic Paints: Opt for high-quality acrylic paints, offering vibrant colors and fast drying times. Essential colors include black, yellow, white, brown, and a touch of orange for the bee’s stripes.
- Brushes: A variety of brush sizes is key. Thin brushes for details like antennae and stripes, medium brushes for the body, and larger brushes for base coats.
- Sealer: A clear acrylic sealer protects your masterpiece from the elements and enhances its longevity.
- Optional Supplies:
- Black Sharpie or Fine-Tip Marker: For outlining details and adding definition.
- Glitter: For adding a touch of sparkle to your bee’s wings.
- Googly Eyes: For a playful and whimsical touch.
- Mod Podge: For creating a glossy finish and sealing delicate details.
- Stencils: For achieving precise patterns and stripes.


The Art of Rock Preparation: A Smooth Canvas for Your Bees
The first step is preparing your rocks for painting. This crucial step ensures a smooth, even surface for your artwork:
- Cleaning: Thoroughly wash the rocks with soap and water to remove dirt and debris. Allow them to dry completely.
- Smoothing: Use sandpaper to smooth out any rough edges or bumps, creating a more consistent surface for painting.
- Priming: For a more vibrant and lasting finish, apply a thin layer of acrylic primer to the rock. Let it dry completely before proceeding.

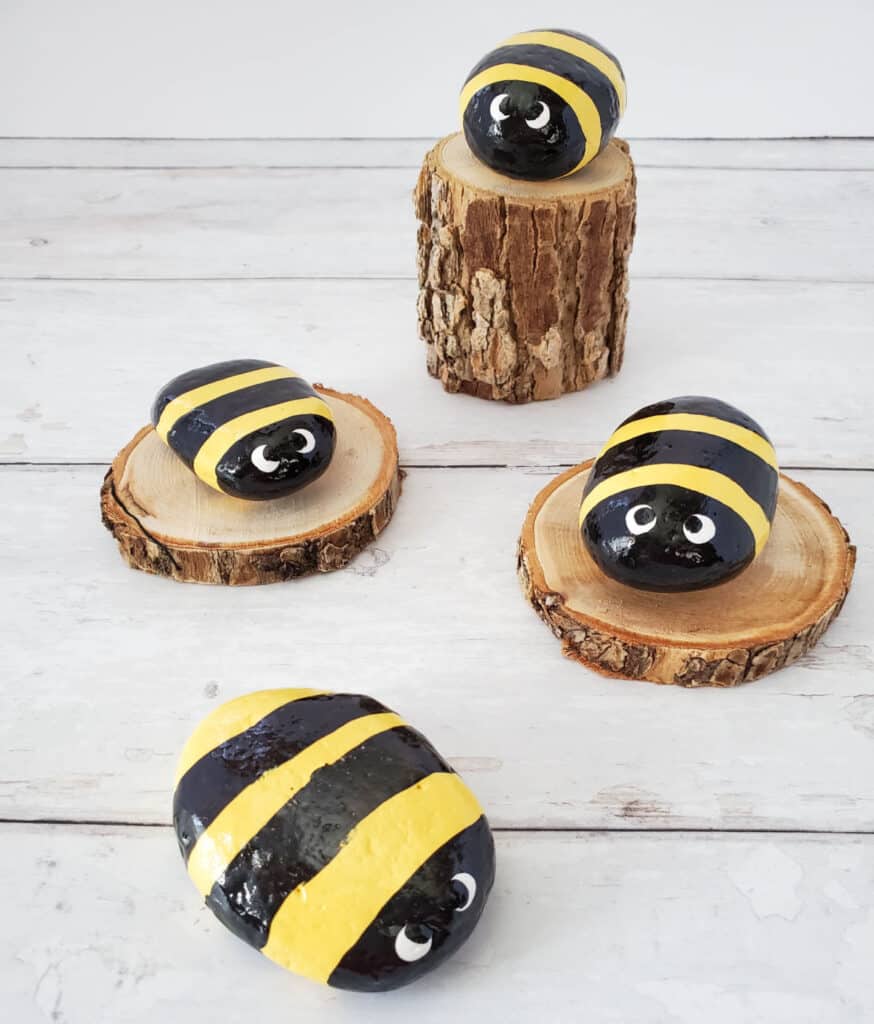
Painting Your Bee: From Humble Rock to Buzzing Beauty
Now, let’s unleash your creativity and transform your rock into a charming bee:
- Base Coat: Start with a base coat of yellow paint, covering the entire rock. Allow it to dry completely.
- Stripes: Using black paint and a thin brush, carefully paint the bee’s stripes. You can opt for a classic black and yellow pattern or experiment with different colors.
- Wings: Using white paint and a larger brush, paint the bee’s wings on the back of the rock. For a more realistic look, you can add a touch of gray or brown to the wing tips.
- Details: Add the finishing touches! Using a black Sharpie or fine-tip marker, draw the bee’s antennae, eyes, and mouth. For a whimsical touch, you can add googly eyes.
- Sealing: Once your bee is completely dry, apply a clear acrylic sealer to protect the paint and enhance its longevity.
Beyond the Basics: Elevate Your Bee Rock Art
Here are some creative ideas to take your bee rock painting to the next level:
- Floral Accents: Add a touch of nature by painting delicate flowers around your bee.
- Textured Wings: Create textured wings by applying glitter or textured paint.
- Honeycomb Pattern: Paint a honeycomb pattern on the rock’s surface for a more intricate design.
- Personalized Touch: Add a name or special message to personalize your bee rock.
- Scenic Background: Create a miniature meadow or garden scene around your bee, incorporating other rock paintings of flowers or leaves.
Displaying Your Bee Rock Art: Spreading the Buzz
Once your bee rock is complete, it’s time to display your creation and share the joy:
- Garden Decor: Place your bee rock in your garden, adding a touch of whimsy and charm to your outdoor space.
- Indoor Decorations: Display your bee rock on a shelf, mantle, or windowsill, bringing a touch of nature indoors.
- Gifts: Gift your bee rock to friends and family, spreading smiles and a touch of creativity.
- Community Art: Participate in local rock painting events and share your bee rock with others, encouraging a sense of community and creativity.
The Power of Rock Painting Bees: More Than Just Art
Creating bee rock art isn’t just about artistic expression; it’s about raising awareness and promoting environmental stewardship. By painting bees, we acknowledge their vital role in pollination and the delicate balance of our ecosystem. Sharing these creations inspires conversations about the importance of preserving our planet’s biodiversity and supporting pollinators.
Conclusion: Let Your Creativity Take Flight
Rock painting bees is a fun and engaging activity for all ages. It allows you to unleash your creativity, express your love for nature, and contribute to a greater cause. So, grab your supplies, let your imagination soar, and create bee rock art that will spread joy and awareness wherever it goes. Happy painting!
Our Form: The Ultimate Guide to Rock Painting Bees: A Comprehensive Guide for Beginners and Enthusiasts
Introduction: Embarking on a Buzzworthy Artistic Journey
Welcome to the vibrant world of rock painting, where ordinary stones transform into enchanting works of art. This comprehensive guide delves into the art of creating adorable bee-themed rock paintings, providing a step-by-step journey for beginners and seasoned artists alike. From choosing the perfect rock to adding intricate details, we’ll equip you with the knowledge and techniques to craft captivating bee rock masterpieces.
Section 1: Gathering Your Supplies: A Bee-utiful Toolkit
Before diving into the creative process, ensure you have the necessary supplies to bring your bee rock visions to life. Here’s a curated list of essential materials:
- Rocks: Seek out smooth, flat rocks with a light-colored surface, preferably in various sizes. These characteristics ensure optimal paint adherence and a blank canvas for your artistic creations.
- Acrylic Paints: Opt for high-quality acrylic paints, known for their vibrant colors and quick drying times. Essential colors include black, yellow, white, brown, and a touch of orange for the bee’s stripes.
- Brushes: A diverse selection of brush sizes is crucial for achieving intricate details and smooth transitions. Thin brushes are ideal for delicate features like antennae and stripes, medium brushes for the bee’s body, and larger brushes for base coats.
- Sealer: A clear acrylic sealer is essential to protect your masterpiece from the elements, ensuring its longevity and vibrant colors remain intact.
- Optional Supplies:
- Black Sharpie or Fine-Tip Marker: For outlining details and adding crisp definition to your bee’s features.
- Glitter: For adding a touch of sparkle to your bee’s wings, creating a mesmerizing shimmer effect.
- Googly Eyes: For a playful and whimsical touch, adding a touch of personality to your bee.
- Mod Podge: For creating a glossy finish and sealing delicate details, adding a layer of protection to your artwork.
- Stencils: For achieving precise patterns and stripes, simplifying the creation of intricate designs.
Section 2: Preparing Your Rock: A Smooth Canvas for Your Bee
The first step in your bee rock painting journey is to prepare your chosen rock, ensuring a smooth and even surface for your artwork. This meticulous preparation guarantees optimal paint adherence and a professional finish:
- Cleaning: Thoroughly wash your rocks with soap and water, removing any dirt, debris, or residue that may interfere with the paint. Allow them to dry completely before proceeding to the next step.
- Smoothing: Use sandpaper to smooth out any rough edges or bumps, creating a consistent surface for painting. This step ensures a seamless application of paint and prevents any unevenness that may detract from your artwork.
- Priming: For a vibrant and long-lasting finish, apply a thin layer of acrylic primer to the rock. This step creates a barrier between the rock’s surface and the paint, enhancing the vibrancy of your colors and ensuring they don’t fade over time. Allow the primer to dry completely before proceeding to the painting stage.
Section 3: Painting Your Bee: From Humble Rock to Buzzing Beauty
Now, it’s time to unleash your creativity and transform your prepared rock into a charming bee. This section provides a step-by-step guide to painting your bee rock, from the base coat to the intricate details:
- Base Coat: Begin by applying a base coat of yellow paint to the entire rock, ensuring a smooth and even coverage. Allow the base coat to dry completely before proceeding to the next step.
- Stripes: Using black paint and a thin brush, carefully paint the bee’s stripes. You can opt for a classic black and yellow pattern or experiment with different colors, adding a personal touch to your creation.
- Wings: Using white paint and a larger brush, paint the bee’s wings on the back of the rock. For a more realistic look, you can add a touch of gray or brown to the wing tips, creating subtle shading and depth.
- Details: Add the finishing touches! Using a black Sharpie or fine-tip marker, draw the bee’s antennae, eyes, and mouth, adding definition and personality to your bee. For a whimsical touch, you can add googly eyes, adding a playful element to your artwork.
- Sealing: Once your bee is completely dry, apply a clear acrylic sealer to protect the paint and enhance its longevity. This step ensures your bee rock masterpiece remains vibrant and protected from the elements, allowing you to enjoy it for years to come.
Section 4: Beyond the Basics: Elevate Your Bee Rock Art
To elevate your bee rock painting from simple to extraordinary, explore these creative ideas that add depth, texture, and personal touches to your artwork:
- Floral Accents: Add a touch of nature by painting delicate flowers around your bee, creating a vibrant and harmonious scene. Use a variety of colors and brushstrokes to depict different flower types, adding a realistic touch to your artwork.
- Textured Wings: Create textured wings by applying glitter or textured paint, adding a mesmerizing shimmer and dimension to your bee’s wings. Experiment with different glitter colors and application techniques to achieve a unique and eye-catching effect.
- Honeycomb Pattern: Paint a honeycomb pattern on the rock’s surface for a more intricate design, adding a touch of complexity and visual interest to your artwork. Use a stencil or freehand drawing techniques to create a realistic honeycomb pattern.
- Personalized Touch: Add a name or special message to personalize your bee rock, making it a unique and meaningful gift for loved ones. Use a fine-tip marker or a small brush to create a personalized message, adding a personal touch to your artwork.
- Scenic Background: Create a miniature meadow or garden scene around your bee, incorporating other rock paintings of flowers or leaves, creating a captivating miniature world. Experiment with different colors and textures to create a realistic and enchanting background for your bee.
Section 5: Displaying Your Bee Rock Art: Spreading the Buzz
Once your bee rock is complete, it’s time to display your creation and share the joy with the world. Here are some inspiring ideas for showcasing your bee rock masterpiece:
- Garden Decor: Place your bee rock in your garden, adding a touch of whimsy and charm to your outdoor space. Choose a location that complements your bee rock, allowing it to stand out and inspire joy.
- Indoor Decorations: Display your bee rock on a shelf, mantle, or windowsill, bringing a touch of nature indoors. Choose a location that receives natural light, highlighting the vibrancy of your artwork.
- Gifts: Gift your bee rock to friends and family, spreading smiles and a touch of creativity. Personalize your bee rock with a special message, making it a thoughtful and unique gift.
- Community Art: Participate in local rock painting events and share your bee rock with others, encouraging a sense of community and creativity. Contribute to a collaborative art project, creating a vibrant collection of bee rocks that represent a shared love for nature and art.
Section 6: The Power of Rock Painting Bees: More Than Just Art
Creating bee rock art is not merely an artistic endeavor; it’s a powerful tool for raising awareness and promoting environmental stewardship. By painting bees, we acknowledge their vital role in pollination and the delicate balance of our ecosystem. Sharing these creations inspires conversations about the importance of preserving our planet’s biodiversity and supporting pollinators.
Section 7: Conclusion: Let Your Creativity Take Flight
Rock painting bees is a fun and engaging activity for all ages, encouraging creativity, environmental awareness, and a connection to nature. This comprehensive guide has equipped you with the knowledge and techniques to create captivating bee rock art that will spread joy and awareness wherever it goes. So, grab your supplies, let your imagination soar, and create bee rock art that celebrates the beauty and importance of these vital pollinators. Happy painting!
Diagram: Essential Bee Rock Painting Supplies
| Item | Description ||---|---|| Rocks | Smooth, flat rocks in various sizes, preferably light-colored. || Acrylic Paints | High-quality acrylic paints in black, yellow, white, brown, and orange. || Brushes | A variety of brush sizes for details, body, and base coats. || Sealer | Clear acrylic sealer to protect the paint and enhance longevity. || Optional Supplies | Black Sharpie, glitter, googly eyes, Mod Podge, stencils. |Keywords: Rock painting, bee, bee rock painting, art, craft, DIY, guide, beginner, tutorial, step-by-step, supplies, techniques, floral accents, textured wings, honeycomb pattern, personalized touch, scenic background, display, garden decor, indoor decorations, gifts, community art, environmental awareness, pollination, biodiversity, creativity.
Buzzing with Creativity: A Beginner’s Guide to Painting Rock Bees
Post a Comment for "Easy Guide To Rock Painting Bees"