The Ultimate Guide to Painting an Oil Tank: Best Practices for a Long-Lasting Finish
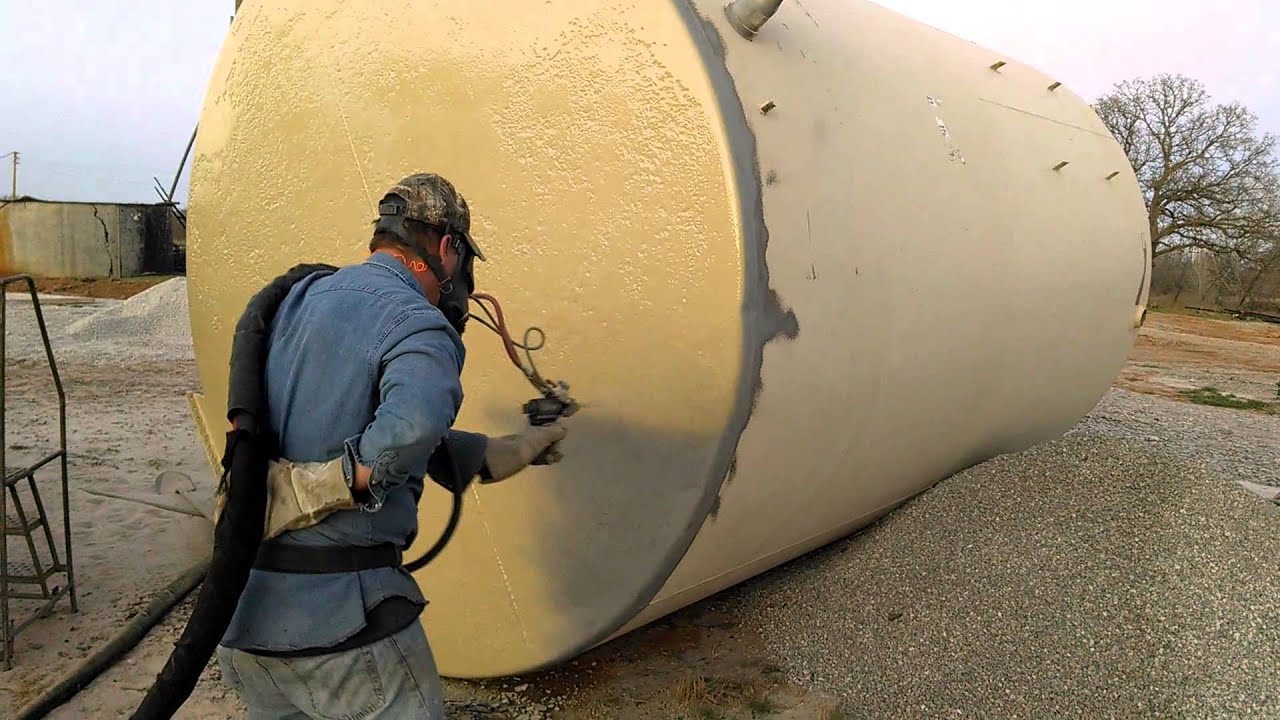
Table of Content
- 1 The Ultimate Guide to Painting an Oil Tank: Best Practices for a Long-Lasting Finish
- 1.1 Preparing Your Oil Tank for Painting: A Foundation for Success
- 1.2 Selecting the Right Paint for Your Oil Tank: Choosing Durability and Aesthetics
- 1.3 Painting Your Oil Tank: Techniques for a Professional Finish
- 1.4 Common Mistakes to Avoid: Ensuring a Successful Paint Job
- 1.5 Beyond the Basics: Advanced Techniques and Considerations
- 1.6 Conclusion: A Well-Painted Oil Tank for Years to Come
Maintaining your oil tank is crucial for ensuring efficient and safe operation. A well-maintained tank not only prevents leaks and spills but also extends its lifespan. Painting your oil tank is an essential part of this maintenance, offering protection against corrosion and enhancing its visual appeal. This comprehensive guide will walk you through the best practices for painting your oil tank, ensuring a durable and long-lasting finish.
Preparing Your Oil Tank for Painting: A Foundation for Success
Before you even pick up a brush, meticulous preparation is key to a successful paint job. Skipping this step can lead to premature paint failure, costing you time and money in the long run.
1. Thorough Cleaning:
- Empty the Tank: Start by draining the tank completely, ensuring no residual oil remains. This is crucial for a clean surface and prevents contamination of the paint.
- Remove Debris: Use a scraper, wire brush, or power washer to remove any rust, dirt, loose paint, or debris from the tank’s exterior. A power washer is particularly effective for stubborn grime, but be cautious to avoid damaging the tank’s surface.
- Degreasing: Apply a degreaser specifically designed for oil tanks. This removes any remaining oil residue and creates a clean, receptive surface for the primer. Allow the degreaser to dwell for the recommended time before rinsing it off thoroughly with water.
2. Rust Removal and Treatment:

- Assess Rust Severity: Carefully inspect the tank for rust. Light surface rust can be treated with a wire brush or sandpaper. For more severe rust, consider using a chemical rust converter or an abrasive blasting method.
- Rust Converter: Apply a rust converter to neutralize existing rust and prevent further corrosion. It transforms the rust into a stable, paintable surface.
- Abrasive Blasting: For heavily rusted tanks, abrasive blasting is a highly effective method. This process removes rust and creates a smooth, uniform surface for paint adhesion. However, it requires specialized equipment and is best left to professionals.

3. Priming for Optimal Adhesion:
- Choose the Right Primer: Select a primer specifically designed for oil tanks. It should be formulated to adhere to metal surfaces and provide excellent corrosion resistance.
- Apply Primer Evenly: Apply the primer in thin, even coats, allowing each coat to dry completely before applying the next. This ensures a smooth, uniform base for the topcoat.
- Consider a Primer with a Rust Inhibitor: For extra protection against corrosion, consider a primer containing a rust inhibitor. This will further safeguard your tank from rusting in the future.
Selecting the Right Paint for Your Oil Tank: Choosing Durability and Aesthetics
The paint you choose plays a critical role in protecting your oil tank and enhancing its appearance. Consider the following factors when making your selection:
1. Durability and Corrosion Resistance:
- Oil-Based Paint: Oil-based paints are known for their durability and resistance to moisture, making them ideal for oil tanks. They offer excellent protection against corrosion and can withstand harsh weather conditions.
- Epoxy Paint: Epoxy paints are highly durable and resistant to chemicals, making them a good choice for oil tanks. They form a hard, protective coating that can withstand abrasion and impact.
- Acrylic Paint: Acrylic paints are water-based and offer good durability and corrosion resistance. They are easier to clean up than oil-based paints and are available in a wide range of colors.
2. Color and Finish:
- Color Choice: Consider the environment where the tank is located and choose a color that blends in or complements its surroundings.
- Gloss Level: Glossy finishes are more durable and easier to clean, but they can highlight imperfections. Matte finishes are more forgiving of imperfections and provide a more subtle look.
3. Environmental Considerations:
- VOC Content: Choose a paint with low VOC (volatile organic compound) content to minimize environmental impact. Look for paints labeled "low VOC" or "eco-friendly."
- Lead-Free Paints: Ensure the paint you choose is lead-free. Lead-based paints are hazardous and should not be used on oil tanks.
Painting Your Oil Tank: Techniques for a Professional Finish
With the preparation complete and the paint selected, it’s time to apply the finishing touches. Follow these techniques for a professional-looking paint job:
1. Applying the Paint:
- Use a Quality Brush or Roller: Choose a brush or roller specifically designed for the type of paint you are using. A high-quality brush or roller will ensure smooth, even application and a professional finish.
- Apply Thin, Even Coats: Apply the paint in thin, even coats, allowing each coat to dry completely before applying the next. This prevents runs, sags, and uneven coverage.
- Follow the Manufacturer’s Instructions: Always consult the paint manufacturer’s instructions for drying times and recommended number of coats.
2. Achieving a Smooth and Even Finish:
- Use a Paint Thinner: For oil-based paints, use a paint thinner to thin the paint slightly, making it easier to apply and preventing brush marks.
- Use a Leveler: A paint leveler can help smooth out any imperfections in the paint surface, creating a more even and professional finish.
- Sanding Between Coats: Lightly sand between coats to create a smoother surface and improve paint adhesion.
3. Protecting Your Paint Job:
- Allow Adequate Drying Time: Allow the paint to dry completely before exposing it to the elements. This ensures the paint cures properly and achieves its full durability.
- Avoid Harsh Chemicals: Avoid using harsh chemicals on the painted surface, as they can damage the paint and cause it to deteriorate.
- Regular Inspection and Maintenance: Inspect the paint job regularly for any signs of damage or wear. Touch up any scratches or chips promptly to prevent rust from forming.
Common Mistakes to Avoid: Ensuring a Successful Paint Job
While painting an oil tank may seem straightforward, there are some common mistakes to avoid that can compromise the quality of your paint job:
1. Inadequate Preparation: Skipping the preparation step is a common mistake that can lead to paint failure. Thorough cleaning, rust removal, and priming are essential for a durable and long-lasting finish.
2. Using the Wrong Paint: Choosing a paint that is not specifically designed for oil tanks can result in poor adhesion, premature peeling, and reduced corrosion resistance.
3. Applying Too Much Paint: Applying thick coats of paint can lead to runs, sags, and uneven coverage. Thin, even coats are essential for a smooth and professional finish.
4. Not Allowing Sufficient Drying Time: Rushing the drying process can result in a weak, brittle paint film that is prone to damage. Allow the paint to dry completely before exposing it to the elements.
Beyond the Basics: Advanced Techniques and Considerations
For those seeking a truly professional and long-lasting finish, consider these advanced techniques and considerations:
1. Professional Blasting and Coating: For heavily rusted or damaged tanks, professional blasting and coating can be the best solution. This process involves removing rust and debris using abrasive blasting and applying specialized coatings for maximum corrosion protection.
2. Specialized Coatings: In addition to standard paint, specialized coatings are available for oil tanks, offering enhanced protection against specific environmental factors. For example, a coating with UV inhibitors can protect the tank from fading caused by sunlight.
3. Environmental Regulations: Be aware of local environmental regulations regarding oil tank painting. Some areas may have specific requirements for paint types and disposal methods.
Conclusion: A Well-Painted Oil Tank for Years to Come
Painting your oil tank is a simple yet essential maintenance task that can significantly extend its lifespan and ensure safe and efficient operation. By following the best practices outlined in this guide, you can achieve a durable and professional finish that will protect your tank for years to come. Remember, proper preparation, the right paint selection, and meticulous application are key to a successful paint job. Invest the time and effort to do it right, and you’ll reap the benefits of a well-maintained oil tank for years to come.

The Ultimate Guide to Painting an Oil Tank: Best Practices for a Long-Lasting Finish
Post a Comment for "Best Practices For Painting An Oil Tank"