Transform Your Floors: A Comprehensive Guide to Chalk Painting Wood Floors

Table of Content
- 1 Transform Your Floors: A Comprehensive Guide to Chalk Painting Wood Floors
- 1.1 Why Choose Chalk Paint for Your Floors?
- 1.2 Preparing Your Floors: A Foundation for Success
- 1.3 Painting Your Floors: A Step-by-Step Guide
- 1.4 Tools and Materials You’ll Need:
- 1.5 Tips for a Successful Chalk Paint Floor Project:
- 1.6 Alternatives to Chalk Paint for Floor Transformations:
- 1.7 Conclusion: A Floor Transformation within Reach
Chalk paint, with its versatility and ease of application, has become a popular choice for furniture transformations. But did you know it can also be used to dramatically revamp your wood floors? This DIY guide will equip you with the knowledge and techniques to successfully chalk paint your floors, bringing a unique and stylish touch to your home.
Why Choose Chalk Paint for Your Floors?
Chalk paint offers several advantages over traditional floor paints:
- Easy Application: Chalk paint’s thick, creamy consistency allows for smooth, even application, making it ideal for DIY projects.
- Versatile Finishes: Chalk paint can be left matte, waxed for a soft sheen, or sealed with a polycrylic topcoat for a durable, washable finish.
- Distressed Look: Chalk paint’s tendency to chip and crack naturally lends itself to creating a charming distressed or vintage look.
- Wide Color Palette: Chalk paint is available in an extensive range of colors, allowing you to personalize your floor with any desired shade.
Preparing Your Floors: A Foundation for Success

Before you grab your paintbrush, it’s crucial to prepare your floors for a successful transformation. This involves:
1. Cleaning and Stripping:
- Thorough Cleaning: Remove all dirt, dust, and grime with a good floor cleaner. Use a vacuum cleaner with a brush attachment to ensure deep cleaning.
- Stripping Existing Finishes: If your floors have a previous finish, like polyurethane or wax, you’ll need to strip it off. Use a chemical stripper according to manufacturer instructions, taking necessary safety precautions.

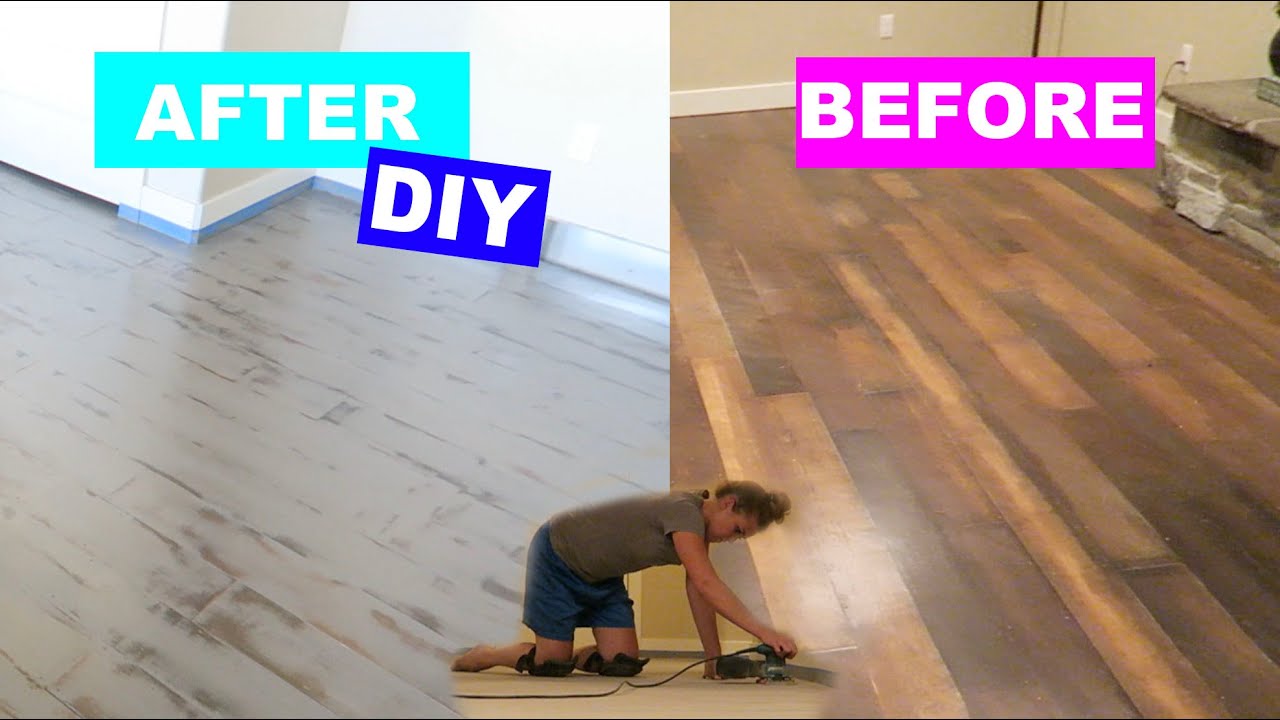
2. Sanding:
- Even Surface: Sand the floor with a coarse-grit sandpaper (80-100 grit) to create a rough surface for the chalk paint to adhere to. Sand with the grain of the wood.
- Smoothing and Refinement: After rough sanding, use a finer-grit sandpaper (120-150 grit) to smooth out any rough patches and create a more even surface.
3. Patching and Repairing:
- Filling Gaps and Cracks: Use wood filler to patch any gaps, cracks, or imperfections in the floorboards. Allow the filler to dry completely before sanding.
- Repairing Damage: For larger repairs, consider using wood putty or epoxy.
4. Priming:
- Adhesion and Protection: Apply a primer specifically designed for chalk paint. This ensures the paint adheres properly and provides a smooth, even base for the color.
Painting Your Floors: A Step-by-Step Guide
With your floors prepped, you’re ready to unleash your creativity!
1. Choosing Your Chalk Paint:
- Color Selection: Consider your desired aesthetic and the existing décor of your space when selecting your chalk paint color.
- Paint Quality: Opt for high-quality chalk paint brands known for their durability and coverage.
2. Applying the First Coat:
- Thin Coats: Apply thin, even coats of chalk paint using a paintbrush or roller. Avoid overloading the brush to prevent drips and runs.
- Drying Time: Allow each coat to dry completely before applying the next. The drying time will vary depending on the paint brand and environmental conditions.
3. Multiple Coats for Rich Color:
- Building Coverage: Apply multiple coats of chalk paint to achieve the desired depth of color and opacity.
- Sanding Between Coats: Lightly sand between coats with a fine-grit sandpaper (220 grit) to create a smooth, even surface.
4. Achieving a Distressed Look (Optional):
- Chipping and Cracking: Create a distressed look by lightly sanding the paint after it’s dry. Focus on areas where wear and tear would naturally occur.
- Waxing for Accentuation: Apply a clear wax to enhance the distressed effect and protect the paint.
5. Sealing and Finishing:
- Protecting Your Floors: Seal the chalk paint with a polycrylic topcoat for a durable, washable finish. Apply multiple thin coats, allowing each to dry completely before applying the next.
- Choosing the Right Sealant: Select a water-based polycrylic topcoat for a smooth, even finish.
Tools and Materials You’ll Need:
- Chalk paint: Choose a high-quality chalk paint brand in your desired color.
- Primer: Use a primer specifically designed for chalk paint.
- Paintbrushes: Select brushes suitable for floor painting, with a width of 2-3 inches.
- Roller: A roller with a nap length of 1/4 inch can be used for larger areas.
- Paint tray and liner: For easy paint application and cleanup.
- Sandpaper: Coarse-grit (80-100 grit) for rough sanding, fine-grit (120-150 grit) for smoothing, and very fine-grit (220 grit) for sanding between coats.
- Wood filler: To patch any gaps or cracks.
- Chemical stripper: If removing existing floor finishes.
- Protective gear: Gloves, mask, and eye protection.
- Drop cloths: To protect surrounding areas from paint spills.
- Wax: For a distressed look and protection.
- Polycrylic topcoat: For a durable, washable finish.
Tips for a Successful Chalk Paint Floor Project:
- Plan Your Project: Measure your floor space and determine the amount of chalk paint you’ll need.
- Work in Sections: Divide your floor into manageable sections to avoid the paint drying too quickly.
- Use a Level: Ensure even paint application by using a level to check for any unevenness.
- Clean Your Tools: Clean your brushes and rollers thoroughly after each use to prevent paint from drying and becoming unusable.
- Ventilation: Ensure proper ventilation during painting and drying to prevent harmful fumes.
- Safety First: Wear protective gear, including gloves, a mask, and eye protection, when using chemicals or sanding.
Alternatives to Chalk Paint for Floor Transformations:
- Milk Paint: Offers a similar distressed look to chalk paint and is environmentally friendly.
- Acrylic Paint: A versatile option with good adhesion and durability.
- Epoxy Paint: Highly durable and resistant to scratches, but requires specialized application techniques.
Conclusion: A Floor Transformation within Reach
Chalk painting your wood floors can be a rewarding and transformative project. By following this comprehensive guide, you can achieve stunning results that will enhance the beauty and character of your home. Remember to plan carefully, prepare your floors thoroughly, and take your time with the painting process. With a bit of patience and creativity, you can create a unique and stylish floor that you’ll love for years to come.

Transform Your Floors: A Comprehensive Guide to Chalk Painting Wood Floors
Post a Comment for "Using Chalk Paint On Wood Floors: A DIY Guide"