Unleash the Force: Crafting Star Wars Pumpkins for a Galactic Halloween
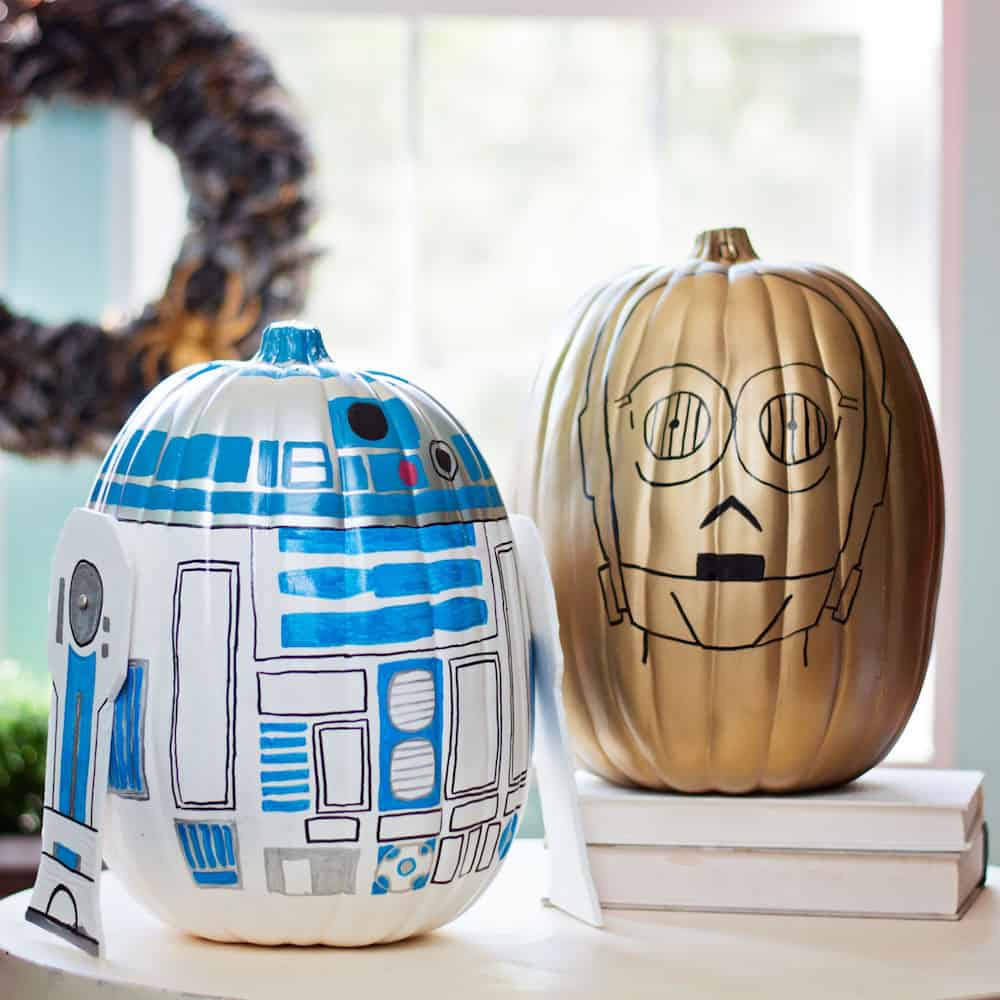
Table of Content
This Halloween, go beyond the ordinary and transform your pumpkins into iconic characters and spacecraft from the Star Wars universe. With a little creativity and the right tools, you can create a galaxy of pumpkins that will leave your neighbors in awe. This guide will walk you through the process, from choosing your pumpkin to adding the finishing touches.
1. Choosing the Right Pumpkin
The first step is selecting the perfect pumpkin for your Star Wars creation. Consider the following:
- Size: Choose a pumpkin that is large enough to accommodate the details of your chosen character or spacecraft. A smaller pumpkin might be suitable for a smaller character like Yoda or a droid, while a larger pumpkin could be perfect for Darth Vader or the Millennium Falcon.
- Shape: The shape of your pumpkin will also play a role in your design. A round pumpkin is ideal for characters like R2-D2 or BB-8, while a more elongated pumpkin might be better suited for a lightsaber or a blaster.
- Color: While most pumpkins are orange, you can find pumpkins in other colors like white or green. This can be helpful if you’re creating a character like Darth Vader or a Stormtrooper.
2. Designing Your Pumpkin
Once you have your pumpkin, it’s time to start designing. Here are some ideas to get you started:

Characters:
- Darth Vader: Paint the pumpkin black and add a red lightsaber using red acrylic paint. You can also use black felt or fabric to create the iconic mask.
- Yoda: Paint the pumpkin green and use brown paint to create the wrinkled skin. You can also add a small stick to represent Yoda’s cane.
- Luke Skywalker: Paint the pumpkin a light brown and add a blue lightsaber using blue acrylic paint. You can also add a black belt and a silver lightsaber hilt.
- Princess Leia: Paint the pumpkin white and add a brown braid using brown yarn or fabric. You can also use a silver paint pen to create the details on her outfit.
- R2-D2: Paint the pumpkin white and blue, and use black paint to create the details on his body. You can also add a small dome on top of the pumpkin to represent his head.
- Chewbacca: Paint the pumpkin brown and use white paint to create the fur on his body. You can also add a small pouch for his blaster.
- Stormtrooper: Paint the pumpkin white and use black paint to create the details on their armor. You can also add a silver paint pen to create the details on their helmet.


Spacecraft:
- Millennium Falcon: Paint the pumpkin gray and use black paint to create the details on the ship. You can also add a small red light on the back of the pumpkin to represent the engine.
- X-Wing: Paint the pumpkin white and add red and orange markings using acrylic paint. You can also add a small red light on the back of the pumpkin to represent the engine.
- TIE Fighter: Paint the pumpkin black and use silver paint to create the details on the ship. You can also add a small red light on the back of the pumpkin to represent the engine.
3. Preparing Your Pumpkin
Before you start painting, you need to prepare your pumpkin. Here are the steps:
- Clean the surface: Wipe down the pumpkin with a damp cloth to remove any dirt or debris.
- Roughen the surface: Use a fine-grit sandpaper to roughen the surface of the pumpkin. This will help the paint adhere better.
- Prime the pumpkin: Apply a coat of primer to the pumpkin. This will create a smooth surface for the paint to adhere to.
4. Painting Your Pumpkin
Now it’s time to start painting your pumpkin. Here are some tips:
- Use acrylic paint: Acrylic paint is the best choice for painting pumpkins because it dries quickly and is easy to clean up.
- Start with a light color: If you’re using multiple colors, start with the lightest color first. This will make it easier to blend the colors.
- Use thin coats: Apply thin coats of paint to avoid cracking.
- Let the paint dry completely: Allow each coat of paint to dry completely before applying the next coat.
5. Adding Details
Once the paint is dry, you can start adding details to your pumpkin. Here are some ideas:
- Use paint pens: Paint pens are great for adding small details like eyes, noses, and mouths.
- Add fabric: You can use felt, fabric, or yarn to create details like hair, clothing, or weapons.
- Use craft foam: Craft foam can be used to create three-dimensional details like helmets, blasters, or lightsabers.
- Use glitter: Add a touch of sparkle to your pumpkin with glitter glue or paint.
6. Finishing Touches
Once you’ve added all the details, you can finish your pumpkin with a few final touches:
- Seal the paint: Apply a sealant to protect the paint and prevent it from fading.
- Add a stem: Attach a stem to the top of the pumpkin for a more realistic look.
- Place your pumpkin: Find a spot for your pumpkin where it can be admired by all.
Materials You’ll Need
- Pumpkin
- Acrylic paint (various colors)
- Paint brushes
- Fine-grit sandpaper
- Primer
- Paint pens
- Felt, fabric, or yarn
- Craft foam
- Glitter glue or paint
- Sealant
- Stem
Tips for Success
- Plan your design: Before you start painting, sketch out your design on paper. This will help you visualize the final product and make sure you have all the necessary materials.
- Work in stages: Don’t try to do everything at once. Break down the project into smaller stages and work on one section at a time.
- Take your time: Patience is key when painting pumpkins. Don’t rush the process.
- Have fun: Most importantly, have fun with it! Let your creativity flow and enjoy the process of creating your own Star Wars pumpkin masterpiece.
Showcase Your Galactic Pumpkin
Once your pumpkin is complete, share it with the world! Post photos on social media using hashtags like #StarWarsPumpkin, #HalloweenPumpkin, and #GalacticHalloween. You can also enter your pumpkin into a local pumpkin carving contest or display it proudly in your home.
Beyond the Basic:
For those seeking an even more immersive Star Wars experience, consider these advanced techniques:
- Light Up Your Pumpkin: Add battery-powered LED lights inside your pumpkin for a glow-in-the-dark effect.
- Create a Scene: Use multiple pumpkins to create a scene from your favorite Star Wars movie, like the Death Star or a lightsaber duel.
- Costuming: Dress up as your favorite Star Wars character to complement your pumpkin creation.
Conclusion
With a little creativity and effort, you can create a galaxy of Star Wars pumpkins that will be the talk of the neighborhood. So grab your brushes, unleash the Force, and let your imagination run wild this Halloween!
Our Form: Unleashing the Force: A Comprehensive Guide to Crafting Star Wars Pumpkins for a Galactic Halloween
Introduction:
This Halloween, transcend the ordinary and transform your pumpkins into iconic figures and vessels from the Star Wars galaxy. This guide will empower you to create a mesmerizing collection of pumpkins that will leave your neighbors in awe. We will journey through the process, from selecting the perfect pumpkin to adding the final touches.
1. Selecting the Ideal Pumpkin
The first step is choosing a pumpkin that perfectly suits your Star Wars creation. Consider the following factors:
- Dimensions: Opt for a pumpkin large enough to accommodate the intricacies of your chosen character or spacecraft. A smaller pumpkin might be suitable for a diminutive character like Yoda or a droid, while a larger pumpkin could be perfect for Darth Vader or the Millennium Falcon.
- Form: The shape of your pumpkin will also influence your design. A round pumpkin is ideal for characters like R2-D2 or BB-8, while a more elongated pumpkin might be better suited for a lightsaber or a blaster.
- Hue: While most pumpkins are orange, you can find pumpkins in other colors like white or green. This can be advantageous if you’re creating a character like Darth Vader or a Stormtrooper.
2. Designing Your Pumpkin: A Universe of Possibilities
Once you have your pumpkin, it’s time to unleash your creativity and start designing. Here are some ideas to ignite your imagination:
Characters:
- Darth Vader: Paint the pumpkin black and incorporate a red lightsaber using red acrylic paint. You can also utilize black felt or fabric to create the iconic mask.
- Yoda: Paint the pumpkin green and employ brown paint to depict the wrinkled skin. You can also add a small stick to represent Yoda’s cane.
- Luke Skywalker: Paint the pumpkin a light brown and add a blue lightsaber using blue acrylic paint. You can also add a black belt and a silver lightsaber hilt.
- Princess Leia: Paint the pumpkin white and add a brown braid using brown yarn or fabric. You can also use a silver paint pen to create the details on her outfit.
- R2-D2: Paint the pumpkin white and blue, and use black paint to create the details on his body. You can also add a small dome on top of the pumpkin to represent his head.
- Chewbacca: Paint the pumpkin brown and use white paint to create the fur on his body. You can also add a small pouch for his blaster.
- Stormtrooper: Paint the pumpkin white and use black paint to create the details on their armor. You can also add a silver paint pen to create the details on their helmet.
Spacecraft:
- Millennium Falcon: Paint the pumpkin gray and use black paint to create the details on the ship. You can also add a small red light on the back of the pumpkin to represent the engine.
- X-Wing: Paint the pumpkin white and add red and orange markings using acrylic paint. You can also add a small red light on the back of the pumpkin to represent the engine.
- TIE Fighter: Paint the pumpkin black and use silver paint to create the details on the ship. You can also add a small red light on the back of the pumpkin to represent the engine.
3. Preparing Your Pumpkin for Artistic Transformation
Before you begin painting, you need to prepare your pumpkin for the artistic journey ahead. Follow these steps:
- Cleaning the Canvas: Wipe down the pumpkin with a damp cloth to remove any dirt or debris.
- Texturing the Surface: Use a fine-grit sandpaper to roughen the surface of the pumpkin. This will enhance the paint’s adhesion.
- Priming for Perfection: Apply a coat of primer to the pumpkin. This will create a smooth surface for the paint to adhere to, ensuring a flawless finish.
4. Painting Your Pumpkin: Bringing Your Design to Life
Now it’s time to transform your pumpkin into a masterpiece. Here are some tips for a successful painting process:
- Acrylic Paint: The Ideal Medium: Acrylic paint is the optimal choice for painting pumpkins because it dries quickly and is easy to clean up.
- Light to Dark: If you’re using multiple colors, start with the lightest color first. This will make it easier to blend the colors seamlessly.
- Thin Coats for a Smooth Finish: Apply thin coats of paint to avoid cracking and ensure a smooth, even finish.
- Patience is Key: Allow each coat of paint to dry completely before applying the next coat. This will prevent smudging and ensure a professional look.
5. Adding the Finishing Touches: Embellishing Your Creation
Once the paint is dry, you can begin adding the details that will bring your pumpkin to life. Here are some ideas to enhance your creation:
- Paint Pens for Precision: Paint pens are ideal for adding small details like eyes, noses, and mouths with precision and control.
- Fabric for Texture and Dimension: Utilize felt, fabric, or yarn to create details like hair, clothing, or weapons, adding texture and dimension to your pumpkin.
- Craft Foam for Three-Dimensional Accents: Craft foam can be used to create three-dimensional details like helmets, blasters, or lightsabers, adding a unique dimension to your design.
- Glitter for a Touch of Sparkle: Add a touch of sparkle to your pumpkin with glitter glue or paint, creating a dazzling effect.
6. Finalizing Your Pumpkin: Ensuring Longevity and Display
Once you’ve meticulously added all the details, you can finalize your pumpkin with a few finishing touches to ensure its longevity and display:
- Sealing for Protection: Apply a sealant to protect the paint and prevent it from fading, ensuring your masterpiece lasts longer.
- Adding a Stem for Realism: Attach a stem to the top of the pumpkin for a more realistic look, completing the transformation.
- Choosing the Perfect Display: Find a prominent spot for your pumpkin where it can be admired by all, showcasing your artistic talent.
Materials You’ll Need for Your Galactic Pumpkin Creation:
- Pumpkin: The foundation of your creation.
- Acrylic Paint (Various Colors): To bring your design to life.
- Paint Brushes: For applying paint with precision and control.
- Fine-Grit Sandpaper: To prepare the pumpkin surface for painting.
- Primer: To create a smooth, even surface for paint adhesion.
- Paint Pens: For adding small details with precision.
- Felt, Fabric, or Yarn: To create textural details and dimension.
- Craft Foam: To create three-dimensional accents.
- Glitter Glue or Paint: For adding sparkle and a touch of magic.
- Sealant: To protect the paint and ensure longevity.
- Stem: To add a realistic touch and complete the transformation.
Tips for Achieving Pumpkin Perfection:
- Planning is Key: Before you start painting, sketch out your design on paper. This will help you visualize the final product and ensure you have all the necessary materials.
- Work in Stages: Don’t try to do everything at once. Break down the project into smaller stages and work on one section at a time. This will make the process more manageable and reduce the risk of mistakes.
- Patience is a Virtue: Patience is key when painting pumpkins. Don’t rush the process. Take your time to ensure a flawless finish.
- Embrace the Joy of Creation: Most importantly, have fun with it! Let your creativity flow and enjoy the process of creating your own Star Wars pumpkin masterpiece.
Showcasing Your Galactic Pumpkin:
Once your pumpkin is complete, share your artistic triumph with the world! Post photos on social media using hashtags like #StarWarsPumpkin, #HalloweenPumpkin, and #GalacticHalloween. You can also enter your pumpkin into a local pumpkin carving contest or display it proudly in your home.
Beyond the Basic: Elevating Your Pumpkin Experience
For those seeking an even more immersive Star Wars experience, consider these advanced techniques:
- Illuminating Your Creation: Add battery-powered LED lights inside your pumpkin for a glow-in-the-dark effect, creating a magical and captivating display.
- Crafting a Scene: Use multiple pumpkins to create a scene from your favorite Star Wars movie, like the Death Star or a lightsaber duel, bringing your favorite moments to life.
- Costuming for a Complete Transformation: Dress up as your favorite Star Wars character to complement your pumpkin creation, creating a complete and immersive experience.
Conclusion: Unleash the Force Within
With a little creativity, effort, and this comprehensive guide, you can create a galaxy of Star Wars pumpkins that will be the talk of the neighborhood. So grab your brushes, unleash the Force within, and let your imagination run wild this Halloween!
Pricing Table:
| Material | Price |
|---|---|
| Pumpkin | $5-$20 |
| Acrylic Paint | $5-$10 |
| Paint Brushes | $5-$15 |
| Fine-Grit Sandpaper | $3-$5 |
| Primer | $5-$10 |
| Paint Pens | $5-$10 |
| Felt, Fabric, or Yarn | $5-$15 |
| Craft Foam | $5-$10 |
| Glitter Glue or Paint | $5-$10 |
| Sealant | $5-$10 |
| Stem | $2-$5 |
Diagram:
[Diagram of a pumpkin with a lightsaber painted on it]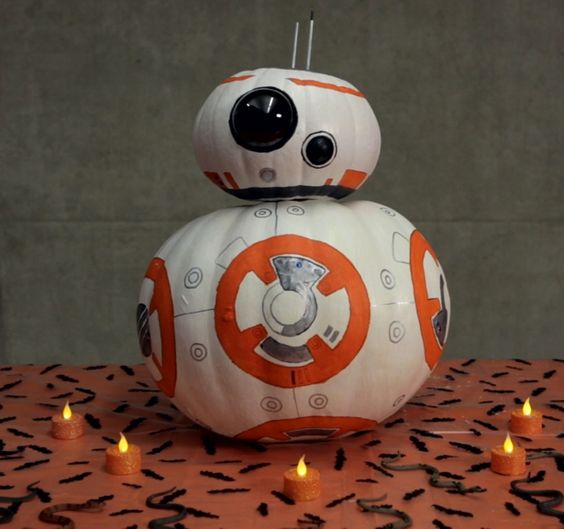
Unleash the Force: Crafting Star Wars Pumpkins for a Galactic Halloween
Post a Comment for "Creating Star Wars Painted Pumpkins For Halloween"